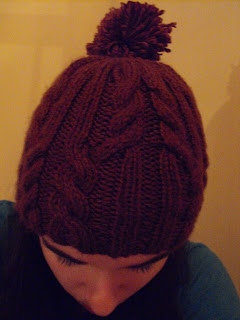
Utopia Hat, two needles


I have to say that I absolutely love this hat. My friends love it too. I was quite disappointed when I first saw the pattern, because it was on an unspecified length of circular needle. I do not own any circular needles, so I thought I was shunned from the world of hat knitting for forever. Thankfully, this was not the case. I came back to the pattern later, and decided to simply re-write it for two-needle knitting. So started my boycott of circular needle knitting.

Needles: US8/5.00mm needles, 1 cable needle or double pointed needle
Yarn: Worsted Weight
Gauge: um... none was given, but the hat fits pretty much every head possible. It just doesn't cover your ears as much as I would like it.

Pattern :)
*if there are any questions about what anything is or how to do anything, look in the Notes section at the end*

Cast on 98sts.

Work the following two rows for 5 Rows:
row 1: K1 *K2, P2* K1
row 2: P1 *K2, P2* P1

Next row: P1 *K2, P2, (K2, P6)x2, K2, P2* P1

Work the following three times:
row 1: K1 *K2, P2, (K6, P2)x2, K2, P2* K1
row 2: P1 *K2, P2, (K2, P6)x2, K2, P2* P1
row 3: K1 *K2, P2, CF6, P2, CB6, K2, P2* K1
row 4: P1 *K2, P2, (K2, P6)x2, K2, P2* P1
row 5: K1 *K2, P2, (K6, P2)x2, K2, P2* K1
row 6: P1 *K2, P2, (K2, P6)x2, K2, P2* P1

Work the following three times:
row 1: K1 *K6, P2, (K2, P2)x2, K6, P2* K1
row 2: P1 *K2, P6, (K2, P2)x2, K2, P6* P1
row 3: K1 *CB6, P2, (K2, P2)x2, CF6, P2* K1
row 4: P1 *K2, P6, (K2, P2)x2, K2, P6* P1
row 5: K1 *K6, P2, (K2, P2)x2, K6, P2* K1
row 6: P1 *K2, P6, (K2, P2)x2, K2, P6* P1

Begin Decreasing:
row 1: K1 *K6, P2, K2, P2Tog, K2, P2, K6, P2* K1
row 2: P1 *K2, P6, K2Tog, P2, K1, P2, K2Tog, P6* P1
row 3: K1 *K2, K2Tog, (K2, P2)x3, K2, K2Tog, K2, P2* K1
row 4: P1 *P6, K1, P1, P1S2TP, P1, K1, P5, K2Tog* P1
row 5: K1 *K1, S2TK1P, K1, P1, K3, P1, K1, S2TK1P, K1, P1* K1
row 6: P1 *K1, P1S2TP* P1
row 7: K1 *SSK* K1 (14 sts left)
row 8: P1 *SSP* P1 (8 sts left)

Cut yarn, and thread it through the remaining sts. Draw tightly and fasten off. Sew up seem with mattress st (click here for help) and the st at either end (left & right sides) of the work. Weave in ends. The pom pom on top is optional. I just like pom poms.


Notes
CF6:
~Slip 3 sts on the cable/DP needle, and hold in front of work
~Knit next 3 sts.
~Knit 3 sts off of cable needle.
CB6:
~Slip 3 sts on cable/DP needle, and hold in back of work
~Knit next 3 sts.
~Knit 3 sts off of cable needle.
S2TK1P:
~Slip 2 sts together (as if K2Tog) onto right needle
~K1
~Slip the 2 slipped sts over the knit st. Slip the two sts at the same time! (combo of K2tog and sl1,K1,psso)
P1S2TP:
Opposite of above technique
~P1, turn work around (so now the right side is facing)
~slip the st you just purled back onto the other needle
~slip 2sts together over the purled sts (like the last step of the above technique)
~turn work back around (wrong side facing) and continue with pattern
SSK and SSP: click here, and find them on the page

Two-Needle Earflap Hat


This is one of my most favorite hat patterns ever!! OK... I just like hats with earflaps, and this was the only two-needle pattern I could find (I have a thing against circular needles). I've gotten so many complements on this hat, so enjoy!

Needles: US10/6.00mm needles, and a couple of DPN (double pointed needle) or stitch holders
Yarn: Bulky. Not sure how much. I know one skein of Lion Homespun made one of these hats and another different hat.
Gauge: 13st and 18 rows = 4" in stocking st.

The original pattern calls for three colors, but you hardly use the third one. I've made on in three colors and one in just one color, and it still looks great. Just mix up the colors however you want. However, I'll write the pattern as if you were using three.

Main Color = MC
Second Color = A
Third Color = B
Pattern :)
Earflaps (Make 2)
Cast on 3st with MC
Row 1 (right side): Knit, increase 1 in each of the first 2 sts. (now you have 5st)
Row 2: Purl
Row 3: K1, m1 (aka make 1; increase in the first stitch), K to last st, m1, K1 (7st total)
Row 4: Purl
Repeat rows 3 & 4 seven more times (21 sts total)
Break MC, switch to A
Repeat rows 3 & 4 two more times (25 sts total)
Next row: Knit, put sts on stitch holder/DPN

Hat Body
Joining Row: Cast on 3 sts with A, move needle to right hand. With wrong side of one earflap facing, purl across earflap (needle should now have 3 CO sts & one earflap). Move needle back to left hand and CO 10 sts. Move needle back to right hand. With wrong side of other earflap facing, purl across earflap (now you have 3 CO sts, earflap, 10 CO sts, earflap). Move needle back to left hand, CO 3 more sts. 66sts total (3 CO sts, earflap, 10 CO sts, earflap, 3 CO sts)

Row 1 (right side): K2 *P2, K2*
Row 2: P2 *K2P2*
Repeat these two rows once more.
Switch to B, work these two rows.
Switch back to A, work these two rows. Break A & B.
With MC, work Stocking st until work from joining row measures 5.75"

Hat Top
Row 1 (right side): K1, [K6, K2tog]x8, K1
Row 2 & all other even rows: Purl
Row 3: K1, [K5, K2tog]x8, K1
Row 5: K1, [K4, K2tog]x8, K1
Row 7: K1, [K3, K2tog]x8, K1
Row 9: K1, [K2, K2tog]x8, K1
Row 11: K1, [K1, K2tog]x8, K1
Row 12: Purl, break yarn.
Thread yarn through remaining sts, draw up tightly & fasten off.

To Finish:
Sew up seem (mattress stitch recommended. For instructions, click here, go to finishing: mattress stitch)
Edging: With B and 6.00mm crochet hook and right side facing, sl st to hat edge at seem, ch1 and work sc around edge, sl st to first sc, fasten off.
Make pom-pom: click here for video instructions
Make Braids: Curt two 30" strands of each color. Fold in half and, with crochet hook, pull loop through the bottom/edge of each earflap, and pull ends through loop to join. Braid with 3 groups of four strands each. Tie with knot at end and trip tassel. Repeat for other earflap.


If you're wondering about the cow on top of my brother's gray hat, I crochet-ed it for him specifically to put on top of the hat. I'll post the cow pattern later.

Socks!

So, I love knitting, and have managed to accumulate quite the collection of free, online knitting patterns. I have often edited patterns, and have decided to share my patterns with everyone! I will, of course, have pictures, and give credit to the places where I obtained the original pattern.

I went through a lot of trouble trying to find a good, basic, sock pattern. I kept running into trouble when it came to heel turning. I did eventually find one. The problem is, the pattern no longer exists online, so I'm going to reproduce it for you :)

Needles: US5 or 3.75mm double pointed needles (set of 4)
Yarn: Worsted Weight. I've found that each 7oz skein can make 3 or more pairs of socks.
Gauge: 20st and 26 rows = 4 inches with 4mm needles in stocking stitch (um... I never pay attention to gauge, so I really don't know how to interpret this)

Sizing
small/medium: 8.5-9.5" foot length
large/extra large: 9.6-11.5" foot length
*These can vary depending on the width of your foot
For converting shoe size to foot length, click here
In pattern, instructions written: small/medium(large/extra large)

Pattern :)
Cast on 40(44) sts. 13(14)st on first two needles, 14(16)sts on last needle.

1.5" K1P1 rib.
Desired length of leg continued ribbing, stocking st, or K3P1 rib (preferred). I generally do another 1.5"

Heel flap: Transfer stitches from second needle to third needle so the number of sts on the third needle totals 20(22) sts. Repeat following 2 rows on THIRD NEEDLE ONLY (that's right, you're knitting flat for a little while), until the work measures 2.5(3)":

slip1, purl across, turn
slip1, knit across, turn

Make sure the last row is a knit row.

Turning heel: (don't worry about the extra stitches left on the row)
row1: P13(14), P2tog, P1, turn
row2: slip1, K7, slip1K1psso, K1, turn
row3: slip1, P8, P2tog, P1, turn
row4: slip1, K9, slip1K1psso, K1, turn
row5: slip1, P10, P2tog, P1, turn
row6: slip1, K11, slip1K1psso, K1, turn
large/extra large only-
row7: slip1, P12, P2tog, turn
row8: slip1, K12, slip1K1psso

Pick up 10(12) sts along the side of the heel closest to the yarn (aka, if knit side of heel is facing you, the left side). Use the little loops formed from the slipped sts on the heel flap and the extra needle. If you had two needles holding the other half of the sts while you were working the heel flap, consolidate them onto one needle. Knit across these sts or continue pattern from leg. Pick up 10(12)sts on the other side of the heel flap.

Now all four needles are being used. To free one up, knit 1/2 of the sts from the heel flap onto the the needle just used to pick up sts. Carefully transfer the other 1/2 to the needle on the other side of the heel flap. The round now starts in the middle of the heel. Sts should now be divided as follows: 17(19) on first needle, 20(22) on second needle (across top of foot), 17(19) on third needle.

Gusset: Alternate the following two rounds until there are 10(11) sts each on the first and third needle.
round 1: needle1- K to the last 3 sts, K2tog, K1; needle 2- continue leg pattern or knit; needle 3- K1, sl1K1psso, K to end of needle
round 2: K even (continue pattern on needle 2 if that's what you're doing)

After you get desired amount of sts on each needle, work even (aka continue round 2 pattern from above) until you get to desired foot length. This is the total foot length minus 3", measured from the little ridge where sts were picked up at the heel.

Toe: Work the following two rounds until there are only 20sts total.
round 1: needle 1- K until last 3 sts, K2tog, K1; needle 2- K1, sl1K1psso, K until last 3 sts (stop doing pattern if you were doing it previously), K2tog, K1; needle 3- K1, sl1K1psso, K until end of needle
round 2: K even
after the last round, knit the sts from needle 1 onto needle 3, so you are only working with 2 needle. Graft together. (for help with grafting, click here, go down to finishing: kitchener stitch)

You're done!

*word of advice: cast on the second sock right away!!!

Credit for pattern: www.royea.net/sock.html
Unfortunately, the site no longer seems to exist.